While technically October is the month that begins fall, I find that people often think of August as their chance to really enjoy true summer since school starts back up in September.
So I decided to do a really fun nail tutorial! Teal is close to my heart because it was my wedding color, and dark blue has always been my husband's favorite color. So I decided to use both of them to create this fun, ocean-like ombre nail. It may take some practice, but these nails will definitely get you noticed!


1.) Okay, first things first: you want to start off with clean nails! So remove any old nail polish, trim your nails to your desired shape, and make sure to trim or at least push back your cuticles.
2.) This might seem boring, but the first coat of paint should be white. When you’re doing ombre nails in light colors, you will always want to put down a coat of white paint because it will make the lighter colors more vibrant.

3.) This step can be skipped, but honestly, it’s going to save you a lot of work later on. I put Elmer’s Glue around and under my nails. This acts as a barrier between your skin and the nail polish and you’ll be able to peel it (and the nail polish that gets on it) right up. Let it dry completely before you start painting and do your best to try to keep the glue off of your nails or you might pull up that polish too.
4.) Now that your base is dry, you can start working on the ombre. You’ll want to buy a bag of these triangles or square-shaped makeup sponges which I have shown in the Amazon link above. You’ll need a lot of these because if you stamp your nails too much with one sponge, pieces of the sponge can come off on the nail and that never looks good.
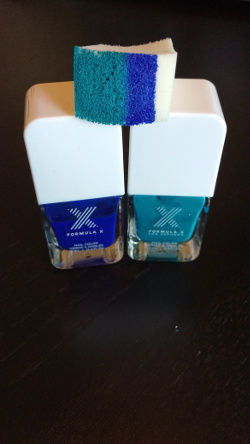
What you want to do is take two colors that look good together. I used Formula X Enigma and Oceanic by Sephora. I do believe these are discontinued so if you want to get the exact nail color as what I have please click on the Amazon links above.

You’ll want to paint the top of the sponge with one color and the bottom with the other. These two colors should be right up next to each other because when you stamp they’ll make a soft gradient and transition well to the next color.
5.) Now that your sponge is ready you’re going to want to stamp it down on each nail and replenish the colors as needed. It’s not going to look perfect the first time! In fact, you’ll probably have some pastel-looking thing after your first stamp. DON’T WORRY ABOUT IT! The more layers you stamp on, the more vivid your colors will get. The thinness of the paint means the drying time will be fairly quick. Remember, the sponges will deteriorate the longer you use them and the last thing you want is clumpy nails.


As you can see from these two photos, the first one on the left is really light. It took loading the sponge with paint, stamping it, and letting it try four separate times before it got the color like the nail on the right.
This step is probably the most difficult. I recommend starting off with one nail, and working on it until you understand how colors blend, and how many times you can use your sponge. This way you don’t waste a ton of paint trying to do ALL your nails at once. Be patient and remember that practice makes perfect.
6.) Assuming that the last step went well for you and your ombre nails are now completely dry, you can start stamping. I exclusively use MoYou London Stamps. I find them to be extremely well-made. For the featured look, I used MoYou London’s stamping plate called Mandala 06, and O.P.I white paint. I also really want to say that having Moyou’s Crystal Clear Nail Stamper is incredibly helpful since it allows you to see where you’ll be stamping. Follow the directions for stamping and place your pattern over your ombre nails.

7.) Now that your design is done, you’ll want to seal it with a clear polish. Be sure not to press the brush down too hard as it could smudge your stamp.
8.) You’re done! carefully peel off the dry glue that you put on in the 3rd step and flaunt your fabulous manicure!

I really hope you enjoy this look! Let me know on your social media by tagging Autumn Becomes Me! -Heather Autumn
Komentarai